Protected member of the class can be accessed in class itself and its derived class
but cannot be accessed outside of the class. This example shows the same.
This program will raise an error
#include<iostream.h>
#include<conio.h>
class demo1
{
protected :
int a,b,c;
public:
void add()
{
a=10; // protected members a,b and c are accessed within the class
b=20;
c=a+b;
cout << c <<endl;
}
};
class demo2: public demo1
{
public:
void sub()
{
a=30; // protected members of the class can be accessed in its derived class.
b=20;
c=a-b;
cout << c <<endl;
}
};
main()
{
clrscr();
demo2 d;
d.add();
d.sub();
d.a=50; // protected members can not be accessed outside of the class.
d.b=60;
d.c=d.a+d.b;
cout << d.c <<endl;
getch();
}
Feb 27, 2008
Protected member of the class in C++
Public Data members of the class in C++
public member of the class can be accessed in class itself, its derived class
and outside of the class. This example shows the same.
#include<iostream.h>
#include<conio.h>
class demo1
{
public:
int a,b,c;
void add()
{
a=10; // public members a,b and c are accessed within the class
b=20;
c=a+b;
cout << c <<endl;
}
};
class demo2: public demo1
{
public:
void sub()
{
a=30; // public members of the class are accessed in its derived class.
b=20;
c=a-b;
cout << c <<endl;
}
};
main()
{
clrscr();
demo2 d;
d.add();
d.sub();
d.a=50; // public members of the class are accessed outside of the class.
d.b=60;
d.c=d.a+d.b;
cout << d.c <<endl;
getch();
}
Private data members of the class in C++
private member of the class can be accessed in class itself but can not be accessed in its derived class and outside of the class. This example shows the same.
This program will raise an error
#include<iostream.h>
#include<conio.h>
class demo1
{
private :
int a,b,c;
public:
void add()
{
a=10; // private members a,b and c are accessed within the class
b=20;
c=a+b;
cout << c <<endl;
}
};
class demo2: public demo1
{
public:
void sub()
{
a=30; // private members of the class can not be accessed in its derived class.
b=20;
c=a-b;
cout << c <<endl;
}
};
main()
{
clrscr();
demo2 d;
d.add();
d.sub();
d.a=50; // private members can not be accessed outside of the class.
d.b=60;
d.c=d.a+d.b;
cout << d.c <<endl;
getch();
}
Feb 23, 2008
Method Overriding in JAVA :
There are methods with same name and definition in subclass and its super class. In this example there is a function called add() in both of the classes super and sub. When this function is called by object of the subclass. add() function of the subclass overrides, the function in super class. add() function of the subclass will be called and add() function of the super class will be hidden.
In this example there is a class called demo1, it has a function called add(). subclass of demo1 is demo2, it also has a function called add() with same definition. When add() function is called by the object of the subclass demo2. add() function of the subclass overrides add() function of demo1 class. This is known as method overriding.
READ MORE - Method Overriding in JAVA :
In this example there is a class called demo1, it has a function called add(). subclass of demo1 is demo2, it also has a function called add() with same definition. When add() function is called by the object of the subclass demo2. add() function of the subclass overrides add() function of demo1 class. This is known as method overriding.
// method overriding demo
|
Feb 19, 2008
How to Protect a document in Microsoft Word:
If you have an important document in Microsoft word and want to protect it from others, Microsoft Word provides with you a special facility called protect a document. By using this facility you can make a document password protected. Follow the given steps and protect your important document with others. After protecting a document Microsoft Word keep track of changes in a document and then you can track the changes and then accept or reject the changes is your desire.
READ MORE - How to Protect a document in Microsoft Word:
Step 1: Click Tools menu and then select Protect Document, Protect Document window will be appeared on the screen.

There are three options for which do you want to protect the document, Here I am describing first two Tracked changes and Comments.
1. Tracked Changes: If you protect the document with this option anybody will change or modify this document without unprotect it, all these changes will be recorded by Microsoft Word. If somebody tries to delete the text from such a document, it wouldn’t delete and show the deleted content in strikethrough style (like this). If somebody wants to try to type some new matter it shows in underline text. Like this.
2. Comment: If you choose comment option then document will be fully protected. You can neither type some matter nor delete anything. You can also not modify such a document. You only allow to type comments.
So choose anyone option for which do you want to protect the document and type a desired password in Password text box then click Ok button. A Confirm Password window will be appeared to ask you to retype the password. Retype the password in the password text box and then press Ok button to confirm.

Now your document is protected according to your option.
Once you protect a document, Changes will be made only after doing unprotect it by using following command.
Click Tools – Unprotect Document – Type your password and click OK button.

Your document will be unprotected and any changes you want in the document would be possible now.
If you protect your document by Track Changes option then someone made changes in your protected document such as typed new matter and deleted some matter. When you open such a document you will get your document as shown the picture below
 Above picture shows that in protected document someone will type new matter that will be in underlined and deleted matter in strikethrough format. Now you want your original matter again.
You can get back your original content by using Track Changes option. To do so Click Tools menu - Track changes then select Accept or Reject changes option, A dialogue box appeared on the screen as shown below.

Select Original option from the dialogue box and you will get back your original content then click Close button to close the dialogue box.
Note: If you want to find changes that have been made in your document press Find forward or backward button. You can also accept or reject modification one by one by pressing Accept button or Reject button from the Accept or Reject Changes dialogue box.
Feb 8, 2008
Microsoft Word (Recording and Playing back a Macro)
When Macro recording will be started, Stop Recording toolbar will be displayed. On this toolbar there are two buttons one is for Stop Recording and Second one is for Pause recording. Now you may start recording macro. For this you do the work which do you want to record. For doing formatting you may click Bold, Italic, Center, Underline or whatever you want to record. If you want to finish recording click Stop Recording button and you are done. You have successfully created a macro.
Note : If you don't get Stop Recording Toolbar then you may access it by clicking View - Toolbar - Stop Recording.
Photo Stop recording button
Playing back a Macro :
Now it is time to playback the macro which we have recorded. To do so select the matter on which do you want to apply formatting then Click Tools Menu - Macro - Macros.
Macros dialogue box will be appeared on the screen. You may also access this dialogue box by press ALT + F8 key.
Photo macros dialogue box.
Now choose your macro from macro name list box which do you want to run and then press Run command button, recorded formatting will be applied on the selected matter and you are done, You have successfully Run a recorded macro.
You may also run the recorded macro by using keyboard shortcut that you have assigned while recording the macro.
READ MORE - Microsoft Word (Recording and Playing back a Macro)
Note : If you don't get Stop Recording Toolbar then you may access it by clicking View - Toolbar - Stop Recording.
Photo Stop recording button
Playing back a Macro :
Now it is time to playback the macro which we have recorded. To do so select the matter on which do you want to apply formatting then Click Tools Menu - Macro - Macros.
Macros dialogue box will be appeared on the screen. You may also access this dialogue box by press ALT + F8 key.
Photo macros dialogue box.
Now choose your macro from macro name list box which do you want to run and then press Run command button, recorded formatting will be applied on the selected matter and you are done, You have successfully Run a recorded macro.
You may also run the recorded macro by using keyboard shortcut that you have assigned while recording the macro.
Read More..............
Spice S585 Model Mobile Downloading MP3:
Today I purchased Spice S585 model with 1 GB memory card. I made a folder called "my music" in it and download some mp3 songs in it. When I put this memory card in mobile phone and started mp3 player, it shows there is no mp3 file. Then I tried a lot with different folder such as MP3, SONGS, AUDIO but failed. At last I tried with "My music" folder and download some mp3 file in it. This time I created same name as previous "My music" but I put capital M of my word. It works nicely. So whenever you face such problem you may try this trick.
READ MORE - Spice S585 Model Mobile Downloading MP3:
Feb 7, 2008
How to Record and Playback Macros in MSWord (Tutorial) :
What is Macro :
Macro makes our day-to-day life eaiser and faster. Macro is a set of commands or instructions that is saved with a name and can be played back when needed by a single command.
Why Macro is needed :
I will show you in detail. Just suppose you have a task and it requires many mouse clicks to accomplish, By Macro recording you can save all those clicks or commands and play back by using single command. It can also be used again and again when required it saves your lots of mouse clicks and your precious time too.
Let's take another example, Just suppose you have written ten paragraphs with heading in MSWord and want to make formatting for that. Now what will you do. You will do formatting for all paragraphs and headings. This is the repititve task and for this you should create a macro, once recorded can be palyed back any numbers of time and your formatting of paragraphs will be done automatically by playing back the macro for each paragraph and headings.
In other case, sometimes you need a table with particular heading and formatting, for this you make always lots of keystrokes and mouse clicks. But now by creating macros you can save those keystrokes and mouse clicks and generate a formatted table automatically.
Here I am going to give detailed process to create not only macro but also play back.
How macro is recorded :
To do so simply click Tools - Macros - Record New Macro. Record macro dialogue box will be appeared on the screen.
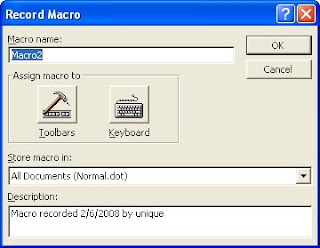
Type in a suitable name for your macro in Macro name text box. If you don't input any name don't worry Microsoft Word is smart it will give name for your macro automatically such as macro1, macro2........
How to create keyboard shorcut for Macro:
In order to create keyboard shorcut for your macro so that you can easily run your macro when needed by a keyboard shorcut (key combination), click Keyboard icon in Record Macro dialogue box. Customize Keyboard dilogue box will be displayed on the screen.

Now place the cursor into Press new shortcut key text box and press any shortcut key such as CTRL + K (Hold down ctrl key and press K) or any other combination with control key, you may also use shortcut with ALT key.
And then click Assign button and then close this window by pressing Close button. Now macro recording will be started.
READ MORE - How to Record and Playback Macros in MSWord (Tutorial) :
Macro makes our day-to-day life eaiser and faster. Macro is a set of commands or instructions that is saved with a name and can be played back when needed by a single command.
Why Macro is needed :
I will show you in detail. Just suppose you have a task and it requires many mouse clicks to accomplish, By Macro recording you can save all those clicks or commands and play back by using single command. It can also be used again and again when required it saves your lots of mouse clicks and your precious time too.
Let's take another example, Just suppose you have written ten paragraphs with heading in MSWord and want to make formatting for that. Now what will you do. You will do formatting for all paragraphs and headings. This is the repititve task and for this you should create a macro, once recorded can be palyed back any numbers of time and your formatting of paragraphs will be done automatically by playing back the macro for each paragraph and headings.
In other case, sometimes you need a table with particular heading and formatting, for this you make always lots of keystrokes and mouse clicks. But now by creating macros you can save those keystrokes and mouse clicks and generate a formatted table automatically.
Here I am going to give detailed process to create not only macro but also play back.
How macro is recorded :
To do so simply click Tools - Macros - Record New Macro. Record macro dialogue box will be appeared on the screen.

Type in a suitable name for your macro in Macro name text box. If you don't input any name don't worry Microsoft Word is smart it will give name for your macro automatically such as macro1, macro2........
How to create keyboard shorcut for Macro:
In order to create keyboard shorcut for your macro so that you can easily run your macro when needed by a keyboard shorcut (key combination), click Keyboard icon in Record Macro dialogue box. Customize Keyboard dilogue box will be displayed on the screen.

Now place the cursor into Press new shortcut key text box and press any shortcut key such as CTRL + K (Hold down ctrl key and press K) or any other combination with control key, you may also use shortcut with ALT key.
And then click Assign button and then close this window by pressing Close button. Now macro recording will be started.
Subscribe to:
Posts (Atom)


