Here is a video tutorial on how to create backgrounds in Photoshop by using filters/plugins.
Showing posts with label Photoshop tips and tricks. Show all posts
Showing posts with label Photoshop tips and tricks. Show all posts
Aug 17, 2011
How to create backgrounds in Photoshop by using filters/plugins
READ MORE - How to create backgrounds in Photoshop by using filters/plugins
33 Best FREE Photoshop plugins resources websites link list
Here I have sort out a big list of Photoshop plugins and filters. There you may find different category of plugins such as 3D effects, Brushes and patterns, Bundles, Special effects, Retouching work, Printing/Imaging, Image Processing, Frame, Export, Design, Compression and related to color. There you may find 10000+ plugins and filters for Photoshop. Some of them are paid and many are free. Some of them are donation ware and shareware too.
1. Adobe Photoshop Marketplace
Here you may find different varieties of plugins. The catagories are General, 3D, Actions, Automation, Scripts, Brushes, Camera Raw, Color, Color Management, Custom shapes, Styles, Effects, Digital asset management, Drawing and painting, editing, Layers, Selections, Filters, Input/Output, Panels (Flash Panels), Templates etc.
2. Photo-plugins
Photo-plugins provides you with different photo plugins such as B/W conversion, Selective saturation, Local Contrast, High Pass Sharpen, Soft Focus, Lens Correction, Contrast Mask, Gradient Blur and many more.
3. PluginsWorld
Here you may find lots of Photoshop plugins and filters of different categories.
4. ThePluginsite
You can find various types of Photoshop plugins such as Image Effects, Photo Enhancement, Web Design, 3D, Patterns and textures, Painting and Drawing, Image format/importing etc.
5. Cybia Software
Here you may find complete classic FX collection.
6. Luce site
Here you may find different varieties of plugins.
7. Photo killer
8. Mehdi Plugins
Here you may find FREE photoshop plugins such as Absolute Color, Blots 2.1, Color Mega Mix, Contrast Balance, Curves, Edges Fx, Equalizer, Eraser Classic and many more.
9. Auto FX
10. Richardrosenman
Here on Richardrosenman you may find varieties of plugins such as 3D sphere generator, Ascii Art, Box Fitting, Buddhabrot, Channel Modifier, Color Bar Generator, Diffuse, Diffuse Glow, Diffusion limited aggregation, Evaluate and many more.
11. Graphic Xtras- Plugin Central
12. Photoshop plugins by namesupressed
13. Xero Graphics - Photoshop compatible plugins
14. Mways - Mysterious ways developments ltd
15. Flaming Pear
16. Photoshop Scripts
17. Technotarget - Free photoshop plugins
18. The Digital Art Shop - Filters
Here you may find different varieties of filters collection.
19. Vicanek.de
20. Retrodots
21. Photoshop support
Here you may find Photoshop plugins, brushes and tutorials and many more.
22. Telegraphics
Most plugins given there usable with all versions of Photoshop under Mac OS X, 9 and earlier, and Windows (if you need a version that's not listed there, you can write them). Should also work with Elements, AfterEffects, Premiere, PhotoDeluxe, Corel PhotoPaint, Paint Shop Pro, Fireworks, Painter, Photo Impact etc. (incomplete list).
23. Vanderlee - Free and commercial Photoshop plugins
24. AFH systems group- Free Photoshop plug-in Filters
If you need to make cool bevels really fast or want to give a photo a chiseled edge ?
or just want to create some quick web buttons or create instant menubars then download the AFH beveler plug-in Filters NOW !
25. Adobe Photoshop Marketplace
Here you may find different varieties of plugins. The catagories are General, 3D, Actions, Automation, Scripts, Brushes, Camera Raw, Color, Color Management, Custom shapes, Styles, Effects, Digital asset management, Drawing and painting, editing, Layers, Selections, Filters, Input/Output, Panels (Flash Panels), Templates etc.
26. HDR Soft - Photomatix - Create stunning photographs of high contrast scenes
27. Red Field - 3D special effects for graphics designers
28. Web Resources Depot - Free Photoshop plugins collection
29. Power Retouche - Best Photoshop plugins for professional photo retouching
30. A-Z of Free Photoshop Plugins
31. Photoshop Roadmap
32. Photoshop Plugins
33. Little Ink Pot - Computer imaging with a natural style
Mar 7, 2007
What is an action in Photoshop?
Actions are set of commands that you have to record once and playback any number of times according to your need. Just suppose you have 100 photographs and you want to change the size of all of the photographs so you can create an action of if and apply to all of 100 photographs so you do not need to change the size of all of your photograph manually Photoshop will do it automatically for you. Or we take another example here if you want to make an array of passport photo means picture package so you can once record an action for it and then within a few seconds you will create picture package by using recorded action in future. In short we can say an action is a set of commands that can be played any number of times.
Most of the commands can be included in actions but some are not.
Start Photoshop and then click “Window > Show Actions”. It will display action palette as shown below.
Most of the commands can be included in actions but some are not.
Start Photoshop and then click “Window > Show Actions”. It will display action palette as shown below.

Feb 24, 2007
Creating picture package in Photoshop: (Tutorial)
Professional photographers always need a method to make an array of passport photo or we may say picture package of passport photo. Here I am explaining step by step process to do the same thing.
Scanning a photograph:
Step 1: Scan the photograph for which you want to make a picture package by your scanner and save the scanned image file.
Step 2: Open the scanned image file in Photoshop.
Resizing the image:
Step 3: Now change the image size by clicking “Image menu > Image size”. Image size dialogue box will be appeared on the screen. Set the Document size type in width as 2 and height as 3 inches and set the resolution as 200. Before doing this also uncheck the Constrain Proportion checkbox and then press “Ok” button to resize the image. For more details on how to resize the image click here and read. After resizing the image your image should look like this.
 Making a border around the photo:
Step 4: Now Click “Select menu > All” to select the entire image. Now click “Edit > Stroke”, Stroke dialogue box will be appeared on the screen. Step 5: Now type in stroke width 5 px and choose Color of stroke as white and choose Stroke Location is “Inside” and Blending mode is normal, Opacity is 100% and then press “Ok” button. Now the image will be looked like the following picture.
 Defining a pattern of image:
Step 6: Now click “Select > All” to select the entire image again and then click “Edit > Define Pattern”. “Define Pattern” dialogue box will be appeared on the screen. It asks for name of the pattern which you want to create. Type in a desired name there and press “Ok” button to close the window. Now we have successfully created a pattern. Creating Package of defined pattern:
Step 7: Now click “File > New” to create a new file. New file dialogue box will be appeared on the screen set width as 8 inches and height as 12 inches and resolution of the image as 200 pixels/inch and then press “Ok” button. A blank 8x12 inches page will be appeared on the screen. Here you may see that we have created a blank page of size 8 width and 12 height and our image size is 2x3 means 2 inches width and 3 inches height so that photo array will be 4x4 means total 16 passport photos. By this way you can calculate the measurement by your requirement and alter the above sizes.
Step 8: Click “Edit > Fill” then Fill dialogue box will be appeared on the screen. Choose “Pattern” from the Use drop down list box and Choose your define pattern from Custom pattern drop down list box. You may find newly created pattern at the end of the custom pattern list. Leave the opacity to 100% and Blending mode as normal and then press “Ok” button to fill the created pattern in blank page and you are done. Hope that you will like this method. If you face any difficulty you can feel free to mail me.
Read other article to create picture package in Photoshop.
Rotating Canvas in Photoshop:
If you have image that is not straight, by rotating canvas you can make it straight or you can rotate the image by giving some angle. You can also flip the image horizontally or vertically. If by mistake you have scanned an image horizontally you need it vertically so this tool will be helpful to you.
 Origional
Rotating an image 180 degree:
Step 1: To rotate an image click “Image menu > Rotate Canvas > 180. Image would be upside down as shown in the following picture. This should be helpful to you if you scanned an image upside down. So by rotating 180 degree problem will be solved.
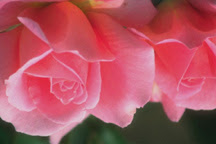
After Rotating an image 180 Degree
Rotating an image 90 degree CW:
To do so click “Image menu> Rotate Canvas > 90 CW”.

After Rotating an image 90 Degree Clockwise
Rotating an image 90 degree CCW:
To do so click “Image menu> Rotate Canvas > 90 CCW”

After Rotating an image 90 Degree Counter Clockwise
Rotating an image arbitrary:
To do so click “Image menu > Rotate Canvas > Arbitrary”. A dialogue box will be appeared on the screen as shown below.
 Through this you can rotate an image by giving appropriate angle. Type in 25 in Angle textbox and choose radio button that you want to rotate the image CW (Clock wise) or CCW (Counter Clock wise). Here I am choosing CW and press “Ok” button to see the result.
Flipping Image Horizontally:
To do so click “Image menu> Rotate Canvas> Flip Horizontal”. Flipping Image Vertically:
To do so click “Image menu> Rotate Canvas>Flip Vertical”.
Feb 23, 2007
Creating Backgrounds in Photoshop: (Tutorial)
In this tutorial we will see that how to create a new file and create background in Photoshop using fill.
You can create special background for your photograph using Fill option in Photoshop.
You can create special background for your photograph using Fill option in Photoshop.
Step 1: Start Photoshop.
Step 2: Click “File > New’. New Dialogue box will be appeared on the screen.
 You can give following things in new dialogue box.
* Name of the Image file
* Size of the image in width and height
* Resolution of the image
* Mode of colors
* Content in the image file
Name Of the Image File:
In name textbox type in an appropriate name of the image file you want.
Size of the image in width and height:
You can also specify size of the image in width and height by typing in their textboxes. Size of the image could be in inches, cm, pixels etc.
Resolution of the image:
Here you can specify resolution of the image whether it is 300, 400 or 600 choose the appropriate one.
Mode of colors:
Choose RGB color from the drop down list box.
Content in the image file:
In Content drop down, Choose “White” if you want to fill background with white. Choose “Background Color” if you want to fill the new file with Background color. This background color can be set from the toolbox as shown below.

When you click “set background color” button as marked in the above picture to change the background color a “Color Picker” dialogue box will be appeared on the screen. Choose the appropriate color for your background and then press “Ok” button to close the Color Picker dialogue box.
 Choose “Transparent” if you want to remain the background transparent.
Step 3: then press “OK” button.

"White" Background Fill
 "Backgroud Color" Background Fill
 "Transparent" Background Fill
Step 4: Click “Edit > Fill”. Fill Dialogue box will be appeared on the screen. There are many option that you can fill in the background of your image.
You can fill
Foreground color
Background color
Pattern
History
Black
50% Gray
White
Foreground and Background colors are which you set from the toolbox.
Step 5: Now choose “Pattern” from the “use” drop down list box. Custom pattern drop down list box will get activate. Now choose any one pattern of your choice from the list. And then choose “Mode” as normal. Now you can specify opacity in percentage. What actually opacity is. Opacity means if you specify 100%, then background would be 100% opaque and 0% opacity means the background would be completely transparent.
Step 6: Leave opacity at 100% and press “Ok” button. Now try with different opacity and do the experiment with fill.
You can change custom patterns by doing the following steps.
Click “Edit > Fill > Custom Pattern”. Now click the button as shown in the following picture. A popup menu will be appeared on the screen choose “pattern2.pat” or “patterns.pat” from the popup menu. A confirmation window will be appeared on the screen press “Ok” to load the pattern in the custom pattern.
 Now you can use newly loaded custom patterns for your background. We can also create user defined patterns in Photoshop by defining new patterns. I will write on this in my forthcoming post.
Technorati Tags : Photoshop, Background , Create , Fill
Feb 22, 2007
Sharpen Filter in Photoshop
This is the one of the best Photoshop filter. If you have some images that is out of focus you can repair them with Sharpen filter in Photoshop up to some level.
Step 1: Open photo in Photoshop which is out of focus.
READ MORE - Sharpen Filter in Photoshop
Step 1: Open photo in Photoshop which is out of focus.

Origional Image
Step 2: Then click “Filter > Sharpen > Sharpen. The image will be sharp. If you need more sharpen then click “Filter > Sharpen > Sharpen More”. After applying sharpen effect image will be looked like this.

After Applying Sharpen More Filter
Step 3: Click “Filter > Sharpen > Sharpen Edges” then only edges of the image will be get shaped as shown in the following picture.

After Applying Sharpen Edges Filter
Changing canvas size in Photoshop
By changing canvas size you can increase area around the image. It does not change the size of the image. It gives us extra working space around the image. To do so
Step 1: open the scanned image or snap you have taken by your digital camera.
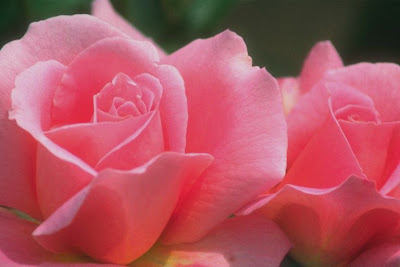
Step 2: Click “Image > Canvas Size”. “Canvas size” dialogue box will be appeared on the screen.
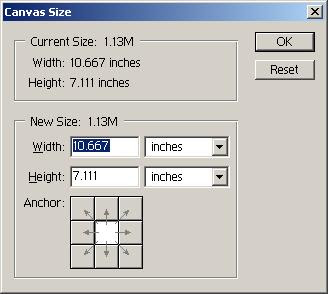 This dialogue box shows the current size of the image. It is now showing 10.667 width and 7.111 height. By changing width and height, you can change the canvas size.
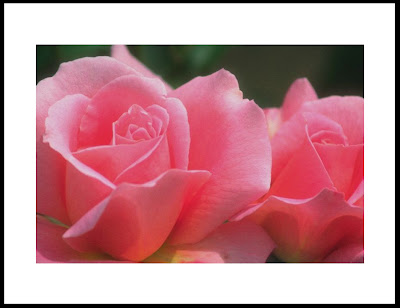
Step 3: Type 13 as a width and 10 as a height. Now the will be looked like this.
 You can also reduce this width and height so that image will be cropped.
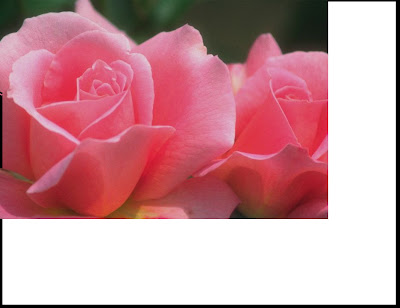
Anchor shows that where you want to put the image after changing the size of the canvas. You can also set the position of the photo by clicking desired anchor point. But by default it is set to the center.
Step 4: Change the anchor point to upper left corner so the image will be place on the upper left corner.
Technorati Tags : Photoshop, Size ,Canvas ,How to
READ MORE - Changing canvas size in Photoshop
Step 1: open the scanned image or snap you have taken by your digital camera.

Step 2: Click “Image > Canvas Size”. “Canvas size” dialogue box will be appeared on the screen.
 This dialogue box shows the current size of the image. It is now showing 10.667 width and 7.111 height. By changing width and height, you can change the canvas size.
Step 3: Type 13 as a width and 10 as a height. Now the will be looked like this.
 You can also reduce this width and height so that image will be cropped.
Anchor shows that where you want to put the image after changing the size of the canvas. You can also set the position of the photo by clicking desired anchor point. But by default it is set to the center.
Step 4: Change the anchor point to upper left corner so the image will be place on the upper left corner.

Technorati Tags : Photoshop, Size ,Canvas ,How to
Feb 21, 2007
Color photograph into Grayscale in Photoshop :
Step 1: Open your color photo in Photoshop.
 Step 2: then click “Image > Mode > Grayscale”. A confirmation window will be appeared on the screen. It will ask you that all color information in the photo will be discarded.
Step 3: Press “Ok” button and you are done. Your color photograph will be converted in a Grayscale image.
Adjusting Brightness and Contrast in Photoshop: (Tutorial)
If you have scanned an image or take a snap by your digital camera and unfortunately that is too dark. So there is an option of adjusting brightness and contrast in Photoshop. Just open your scanned image in Photoshop.

Before Adjusting Brightness/Contrast
Click image > Adjust > Brightness/Contrast. “Brightness/Contrast” window will be appeared on the screen. Now adjust the brightness/contrast slider of the window. Also make sure that “Preview” Checkbox is checked. See the result when you are adjusting brightness/contrast then press “Ok” button when you are done.

After Adjusting Brightness/Contrast
Also there is an option to set the contrast of an image automatically. For that click “Image>Adjust>Auto Contrast”. Use this feature if you don’t have enough time to set the Brightness/Contrast of a picture.
Technorati Tags: Photoshop ,Photo , Contrast, Brightness, How to
How To Resize Picture in Photoshop (Enlarge or Reduce Images):
Sometimes we need to resize image. Whether it may be to enlarge or reduce the size of photo. We can easily achieve the same thing in Photoshop. Follow this process, which is given below.
Step 1: Open the photo file, which is to be reduced or enlarged in Photoshop.
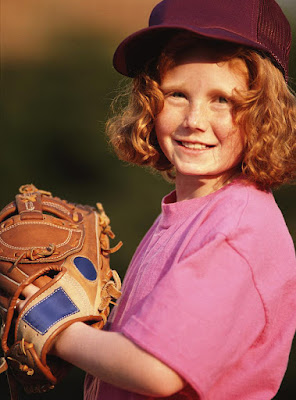 Step 2: Click “Image” Menu then, Choose “Image Size” from the menu options.
Step 3: “Image Size” dialogue box will be appeared on the screen.
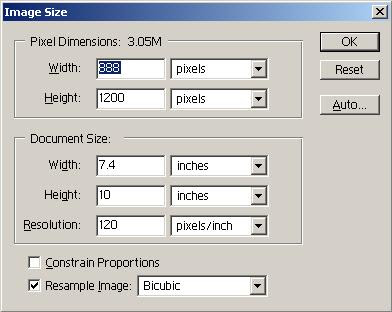
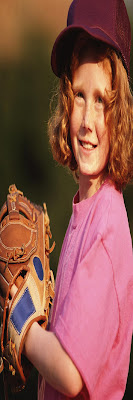
“Image Size” dialogue box shows size of image. In the case of above picture Its pixel dimension shows width of the image is “888” pixels and height of the image is “1200” pixels. This image size can be changed.
Step 4: Change its width to “400” pixels by typing in its width text box. Only width of image will be changed as shown in the following photo.
If we want to change size of the photo in proportion, check the “Constrain Proportion” Check box. Then change the size o the photo, now photo will be resized in proportion.
 Pixel dimension shows the size of photo in pixel by default. We can change this in “Percent” by selecting “Percent” option from the drop down list along with width and height text box. By default it shows the size of image is 100 percent width and 100 percent height. We can change this to any percent of our choice. If we want it the half of the current size set it to 50 percent. If we want the size of image is double the current one then set it to 200 percent. By this way we can enlarged or reduce the size of image easily.
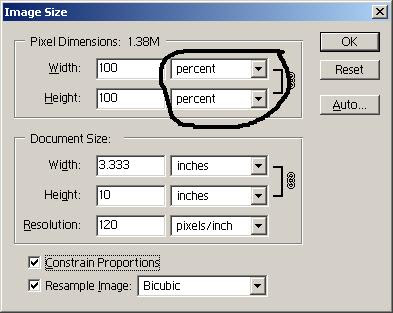 “Image size” dialogue box also shows “Document size”. There we can give size of image in inches, cm, point etc. Type width and height of the image in inches, cm or point according to your need.
In “Image size” dialogue box, you can also set resolution of the image.
Technorati Tags : Photoshop ,Resize , Photo, How to
Step 1: Open the photo file, which is to be reduced or enlarged in Photoshop.
 Step 2: Click “Image” Menu then, Choose “Image Size” from the menu options.
Step 3: “Image Size” dialogue box will be appeared on the screen.

“Image Size” dialogue box shows size of image. In the case of above picture Its pixel dimension shows width of the image is “888” pixels and height of the image is “1200” pixels. This image size can be changed.
Step 4: Change its width to “400” pixels by typing in its width text box. Only width of image will be changed as shown in the following photo.

If we want to change size of the photo in proportion, check the “Constrain Proportion” Check box. Then change the size o the photo, now photo will be resized in proportion.
 Pixel dimension shows the size of photo in pixel by default. We can change this in “Percent” by selecting “Percent” option from the drop down list along with width and height text box. By default it shows the size of image is 100 percent width and 100 percent height. We can change this to any percent of our choice. If we want it the half of the current size set it to 50 percent. If we want the size of image is double the current one then set it to 200 percent. By this way we can enlarged or reduce the size of image easily.
 “Image size” dialogue box also shows “Document size”. There we can give size of image in inches, cm, point etc. Type width and height of the image in inches, cm or point according to your need.
In “Image size” dialogue box, you can also set resolution of the image.
Technorati Tags : Photoshop ,Resize , Photo, How to
Nov 24, 2006
Picture Package in PhotoShop: (Tutorial)
Picture Package in PhotoShop: (Tutorial)
Photoshop is powerful & flexible photo editing tool through which we can do almost all kinds of photo editing work here I am describing that how you can create picture package in Photoshop. Picture package is one of it’s best features. It is nothing but multiple copies of an image in a single page this multiple copies of images can be of same size or different size.
Picture package let’s you customize in many ways you can choose from a different sizes & different placement options
Photoshop is powerful & flexible photo editing tool through which we can do almost all kinds of photo editing work here I am describing that how you can create picture package in Photoshop. Picture package is one of it’s best features. It is nothing but multiple copies of an image in a single page this multiple copies of images can be of same size or different size.
Picture package let’s you customize in many ways you can choose from a different sizes & different placement options
This is very useful for photo studios through this they can make array of passport or stamp size photographs quickly or they may create a package of different size using same image.
Creating picture package:
Here are the steps to create a picture package
Step 1: Scan a photograph for which do you want to create a picture package with yours favorite scanner & save the file with an appropriate name.
Step 2: Start ‘Photoshop’ package.
Step 3: Click file > Automate > Picture Package option.
Step 4: Picture Package dialogue box will be appeared on your screen. Choose an image for which you are intended to create a picture package by clicking ‘Choose’ button or if you already have the source image opened on your screen then select ‘Use front most document’ check box..

Step 5: Choose Layout from the layout option, picture package dialogue box also shows preview for selected layout
Step 6: Input resolution values for the package in resolution option.
Step 7: Choose appropriate color mode & click ‘Ok’ to create picture package.

Customizing Layout:
You can also customize layout according to your needs when you can’t find layout of your choice in layout option predefined layouts are store as a text file in “C:\Program Files\Adobe\Photoshop 6.0\Presets\Layouts”
These type of text file can be created according to your needs. You can create new layouts or edit existing layouts by using any text editor like ‘Notepad’ or DOS’s edit command. Just suppose you want to create a new layout which has document size 8x10 inches where 8 is width and 10 is height of an image & this document will have 2 (4x6) size photographs. So let’s create this text file in ‘Notepad’ application here are the steps to do it.
Step 1: Start ‘Notepad’ application
Step 2: Enter this following line on the first line of the file.
I 8 10
Here ‘I’ is measurement unit in inches & 8 , 10 is width & height respectively of the document. You can also use other unit, like centimeter & pixels use letter C or c for centimeter & P or p for pixels.
Step 3: Second line of the file has ‘Caption’ that you want to appear in picture package dialogue box. Enter following line in the second line of the file
2 ( 4 x 6 )
Step 4: in the next lines enter the position & dimensions of image which you want to appear in the document type following lines in the file.
0.5 0.5 6 4
0.5 5 6 4
These above each line for each picture which you want to appear in the document. This lines have size & dimensions of the picture each lines have four values which is separated by a space. These values are for c1 r1 c2 r2 for the first line Where
c1=0.5
r1=0.5
c2=6
r2=4
& for the second line
Where
c1=0.5
r1=5
c2=6
r2=4

Step 5: Save this file with an appropriate name in
“C:\Program Files\Adobe\Photoshop 6.0\Presets\Layouts”
Step 6: Use this newly created layout in Photoshop by clicking file> Automate>picture package option. There you may find new layout, which you have created.
Step 7: Choose an appropriate image by clicking ‘Choose’ button & then click ‘Ok’ button to create picture package your picture package will be created. So by this way you can create as many job a file as your needs.
Creating multiple image picture package
Step 6: Use this newly created layout in Photoshop by clicking file> Automate>picture package option. There you may find new layout, which you have created.
Step 7: Choose an appropriate image by clicking ‘Choose’ button & then click ‘Ok’ button to create picture package your picture package will be created. So by this way you can create as many job a file as your needs.
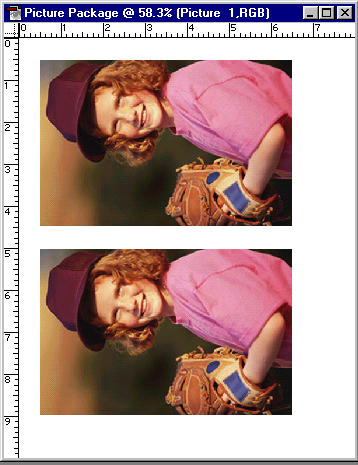
Creating multiple image picture package
By using picture package option we can create a package, of multiple copies of same image. It is also possible to create a picture package of different images in photo shop. This can be used to create catalogue of photos. This is known as contact sheet. Here are the steps to achieve this:
Step 1: Close all opened images, create a folder & copy all images into this folder, which you want in the catalogue.
Step 2: Click File>Automate>Contact Sheet II
Step 3: ‘Contact Sheet II’ dialog box will be appeared on the screen.

Step 4: Click ‘Choose’ button & specify folder name which contains images which you want to be appeared in the contact sheet.
Step 5: Under document options specify width & height of the contact sheet document & also specify appropriate resolution & unit of resolution & color mode.
Step 6: In thumbnail section you can specify layout of the document. By place option you can choose either ‘Across First’ or ‘Down First’. ‘Across First’ means images will be filled horizontally & ‘Down First’ means images will be filled vertically into the document. In thumbnails section also specify no of colums & rows that you want in contact sheet document.
If you specify 2 columns & 3 rows then total 6 images can be appeared in one contact sheet. If the folder which you have specified here has more images then according to no. of images more contact sheets will be created automatically.
Step 7: Select ‘Use filename as caption’ to give captions to images as filename & you can also choose font & font size for the caption.
Step 8: Dialogue box also shows preview for the contact sheet click ‘Ok’ button to create contact sheet.

Creating an action to automate the task:
An action is a series of commands like a batch file that you can play back. Through action we can automate any photoshop job for example you can create an action for creating Array of passport / Stamp size photos, just suppose you want to create an Array of 16 (2x3) inches images. Here are the steps to create an action for above job.
Step 1: Open an image for which you want to create an Array
Step 2: Open actions pallate by clicking window>Show actions.

Step 3: Click ‘Create new action’ button from action pallate.

Step 4: New action dialogue box will be appeared on your screen, give appropriate action name & also choose a function key for shortcut then press ‘Record’ button to start recording.
Step 5: Now we have to create a pattern for the image which we have opened so click ‘Select’ menu then choose ‘All’ from the menu.
Step 6: Go to ‘Edit menu’ & click ‘Define pattern’ option. A dialogue box will be appeared on the screen give appropriate pattern name & press ‘Ok’ button pattern of image will be created.
Step 7: This pattern can be filled in any document so create a new file by clicking File> New give appropriate value for the width, height & resolution & choose color mode & then press ‘Ok’ button. Here I am giving width as 8 inches & height as 12 inches.
Step 8: Click ‘Edit’ menu & choose ‘Fill’ option from the menu. ‘Fill’ dialogue box will be appeared on the screen under contents select use ‘Pattern’ from the drop down list & from the ‘Custom pattern’ choose pattern which you have created under ‘Blending’ choose appropriate mode & opacity & then press ‘Ok’ button & that’s all recording job is over.
Step 9: Now stop recording by clicking ‘Stop recording’ button from action pallate.
Using an action
Follow the steps to use the action –
Step 1: Open an image for which you want to create an action.
Step 2: Press the shortcut key of action which you have defined. Action will be played & array of passport size photo will be ready automatically. All jobs which

you have defined in action will be done automatically. By this way you can create as many actions as you need. Actions can be saved for future use. To save an Action first you need to create an action set by clicking ‘Create new set’ button from the action palate & then create new actions & save the actions by ‘Save Action’ options from the action pallate further this action can be loaded by choosing ‘Load Actions’ option from the action pallate. Action can be created for any job it saves our valuable time.
Technorati Tags: Photoshop ,Picture Package , How to
Subscribe to:
Posts (Atom)


