How To Eject CD from CD-ROM drive if it is Stuck :
If you have a CD into CD-ROM drive and it is stuck and you are trying to eject tray of CDROM by pressing the eject button or windows eject command but CD won't eject as there is no command to eject a stuck compact disc from the CDROM drive then this article is for you.
Step 1: Switch off the computer.
Step 2. On the front of the CD-ROM drive you may find a small hole called Emergency Eject hole below the tray of CD-ROM drive . Take a long pin around 3 inch, (also known as CD ejector) it must be hard enough, insert this pin inside the hole and push a little. The CD tray will slightly move to out.
Step 3: Now you may manually pull the tray and you are done. You have successfully ejected the stucked CD.
Step 4: Switch on the computer and you may work as usual.
for more details Watch this video :
http://www.youtube.com/watch?v=EjOBQWSjrg0
Jul 27, 2007
Jul 26, 2007
How to configure windows Vista To take Unicode Hindi :
Are you using Windows Vista and want to type Unicode Hindi then this article is for you. By configuring Windows Vista to take Unicode Hindi you can use it to create a Hindi Blog.
So If you want to type unicode hindi in Windows Vista. Here are the steps to do so.Click "Start" : "Control Panel" then click "Clock , Language and region" option. A windows will be appeared on the screen
Now click "Change keyboards or other input methods" in Regional and Language Options. Now "Regional and Language Options" windows will be appeared on the screen. Click "Change Keyboards" button. "Text Services and Input Languages" window will be appeared on the screen. dNow click "Add" button, "Add input Language" window will be appeared on the screen. Choose Hindi language from the list and double click to expand it. Expand Keyboard option and Check "Devnagari - INSCRIPT" check box and then press "OK" button.
Now click "Language Bar" tab of "Text Services and Input Languages" window then click "Floating on Desktop" option and then press "Ok" button.
Now Language bar will be displayed on the top right corner of the desktop. Choose "Hindi' From the language bar and then you can type unicode Hindi everywhere in Windows Vista even you can save a file with Hindi filename. By this way you can configure Windows Vista for other languages too.
Related Article
How to create a Hindi Blog on Blogger
Technorati Tags : Windows , Vista , Unicode, Hindi
How to set Classic Start menu in Windows Vista :
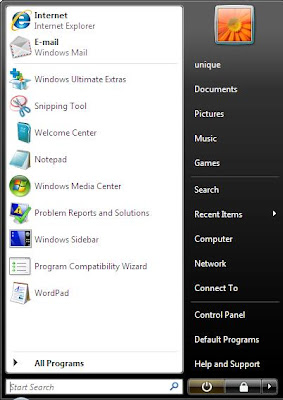
If you don't like Windows Vista start menu so there is a simple step to change WindowsVista Start menu into Classic start menu. Classic start menu like previous version of windows that is windows 98, windows 2000 etc.
To do so right click on the "Taskbar" and then choose "Properties" from the popup menu.
Taskbar and Start menu Properties Dialogue box will be appeared on the screen.
Now click "Start Menu" tab and then click "Classic Start Menu" Option button and then
click "Ok" to finish.
How to set Classic View of Control Panel in Windows vista :
To do so click "Start" : "Control Panel" then click "Classic View" at the upper left
corner of the Control Panel window.
Technorati Tags : Windows , Vista , Classic , Start , Menu
Jul 25, 2007
Windows Vista Shortcuts
Windows Key + Spacebar : To bring all gadgets on the front and sidebar
Windows Key + F : To Search File and Folders
Windows key + Break : To show 'System Property' Dialog box (COntrol Panel)
Windows key + D : TO display desktop
Windows Key + M : To Minimize all windows
Windows Key + Shift + M : To Restore all windows
Windows Key + E : To open 'Computer'
Windows Key + L : To Lock Computer
Windows Key + R : TO Open 'Run' dialog
Window Key + G : To switch between Gadgets in sidebar
F2 : To Rename a Selected Item
F3 : To Search for a file or Folder
Alt + Enter : To display selected Item property
Alt + F4 : To close the active window
Alt + Tab : To Switch between opened window
Ctrl+ Alt + Tab : To Switch between opened window with the facility to choose
Alt + Esc : To switch between Windows in order which they opened
Ctrl + Esc : To Open Start Menu (You can use this shortcut if you don't have window key in your keyboard)
Window Key : To Open Start Menu
Hold Shift : To stop autoplay When you insert a CD
Ctrl + Shift + Esc : TO display Task Manager
Ctrl + Tab : TO switch between Tabs in a dialog box
Download the above image and paste it on the desktop of your Windows Vista screen and use these shortcuts to work faster.
Some Useful Information About Windows Vista :
"My" word has been dropped in Windows Vista :
In Previous version of Windows like Windows 98, Windows XP, Windows 2000 there was My Computer, My Picture, My Document, My Music etc but from now on in
Windows Vista "My" word has been dropped. Thanx to Microsoft that from now on we don't need to speak one extra word "MY". In Windows Vista We can simply
speak Computer, Music, Network, Document.
"Desktop Properties" has been given a new name "Personalize" :
In Previous version of Windows when you right click on the desktop to change the desktop properties like Background, Screen Saver etc there will an option
"Properties" But in Windows Vista it is said "personalize" means you can personalize your desktop settings by using the option.
Transparent Recycle Bin :
You will find completely tranparent Recycle Bin.
Start button is replaced with Windows Logo :
In Windows Vista There is a button to open start menu but it is not saying "Start" like previous version of windows.
New Sidebar added to windows Vista's Destop :
Sidebar Contains gadgets like Calendar, Clock, Contacts, Feed Headlines, Slide Show, Picture Puzzle and Notes. Gadgets are customizable mini programs.
Jul 19, 2007
Program To Demonstrate Item Event
//if user click on any of the list option background color will be changed according //to the option.
import java.awt.*;
import java.applet.*;
import java.awt.event.*;
public class listdemo extends Applet implements ItemListener
{
List cc;
String s;
public void init()
{
cc = new List();
cc.add("Red");
cc.add("Green");
cc.add("Blue");
add(cc);
cc.addItemListener(this);
}
public void itemStateChanged(ItemEvent e)
{
repaint();
}
public void paint(Graphics g)
{
s=cc.getSelectedItem();
if (s=="Red")
{
setBackground(Color.red);
}
if (s=="Green")
{
setBackground(Color.green);
}
if (s=="Blue")
{
setBackground(Color.blue);
}
}
};
How to Disable Default Layout In JAVA
By setting layout to null you can customize your own layout style. SetLayout(null) statement will disable default FlowLayout and then by using setBounds() function you can easily set location of any control and width and height of the control as well. setBounds() function has four parameters.
import java.awt.*;
import java.applet.*;
public class lademo extends Applet
{
Button b1;
TextField t1;
public void init()
{
setLayout(null);
t1 = new TextField(10);
b1 = new Button("Hello");
add(b1);
add(t1);
b1.setBounds(100,200,100,50); // coloumn, row, width, height
t1.setBounds(100,400,100,50);
}
};
Technorati Tags : JAVA, Default Layout
Jul 11, 2007
JAVA PROGRAM TO GENERATE CONECNTRIC CIRCLES:
In C++ to draw a circle on the screen, Radius of circle is used. But in Java to do the same task width of a circle and height of a circle is used. In C++ x and y coordinates are used for the center point of the circle but in JAVA x and y coordinates for top corner and left corner are used. So if we want to generate concentric circles in JAVA the following logic should be used.
import java.awt.*;
import java.applet.*;
public class appletdemo extends Applet
{
public void paint(Graphics g)
{
try
{
for (int i=10;i<=100 ;i=i+10 )
{
g.drawOval(200-i/2,200-i/2,i,i);
Thread.sleep(100); // To generate a delay n miliseconds
}
}
catch(Exception e)
{
}
}
};
Technorati Tags : JAVA Concentric Circles Program
import java.awt.*;
import java.applet.*;
/*
<applet code="appletdemo" height="400" width="500">
</applet>
*/
public class appletdemo extends Applet
{
public void paint(Graphics g)
{
try
{
for (int i=10;i<=100 ;i=i+10 )
{
g.drawOval(200-i/2,200-i/2,i,i);
Thread.sleep(100); // To generate a delay n miliseconds
}
}
catch(Exception e)
{
}
}
};
Technorati Tags : JAVA Concentric Circles Program
Jul 10, 2007
MULTIPLICATION OF TWO MATRICES IN JAVA:
class matmul1
{
public static void main(String[] args)
{
int p[][],q[][],r[][],s[][],temp=0,i,j,k,temp1=0;
p=new int[3][3];
q=new int[3][3];
r=new int[3][3];
s=new int[3][3];
for (i=0;i<=2;i++) // first matrix input
{
for (j=0;j<=2 ;j++)
{
p[i][j] = i;
}
}
for (i=0;i<=2;i++) // first matrix output
{
for (j=0;j<=2 ;j++)
{
System.out.print(p[i][j]+" ");
}
System.out.println();
}
System.out.println();
for (i=0;i<=2;i++) // second matrix input
{
for (j=0;j<=2 ;j++)
{
q[i][j] = j;
}
}
for (i=0;i<=2;i++) // second matrix output
{
for (j=0;j<=2 ;j++)
{
System.out.print(q[i][j]+" ");
}
System.out.println();
}
System.out.println();
for (k=0;k<=2 ;k++) // multiplication of matrix
{
for (i=0;i<=2;i++)
{
for (j=0;j<=2 ;j++)
{
temp=p[k][j]*q[j][i];
temp1=temp+temp1;
}
System.out.println(temp1);
r[k][i]=temp1;
temp1=0;
}
}
for (i=0;i<=2;i++) // output of multiply.
{
for (j=0;j<=2 ;j++)
{
System.out.print(r[i][j]+" ");
}
System.out.println();
}
}
}
{
public static void main(String[] args)
{
int p[][],q[][],r[][],s[][],temp=0,i,j,k,temp1=0;
p=new int[3][3];
q=new int[3][3];
r=new int[3][3];
s=new int[3][3];
for (i=0;i<=2;i++) // first matrix input
{
for (j=0;j<=2 ;j++)
{
p[i][j] = i;
}
}
for (i=0;i<=2;i++) // first matrix output
{
for (j=0;j<=2 ;j++)
{
System.out.print(p[i][j]+" ");
}
System.out.println();
}
System.out.println();
for (i=0;i<=2;i++) // second matrix input
{
for (j=0;j<=2 ;j++)
{
q[i][j] = j;
}
}
for (i=0;i<=2;i++) // second matrix output
{
for (j=0;j<=2 ;j++)
{
System.out.print(q[i][j]+" ");
}
System.out.println();
}
System.out.println();
for (k=0;k<=2 ;k++) // multiplication of matrix
{
for (i=0;i<=2;i++)
{
for (j=0;j<=2 ;j++)
{
temp=p[k][j]*q[j][i];
temp1=temp+temp1;
}
System.out.println(temp1);
r[k][i]=temp1;
temp1=0;
}
}
for (i=0;i<=2;i++) // output of multiply.
{
for (j=0;j<=2 ;j++)
{
System.out.print(r[i][j]+" ");
}
System.out.println();
}
}
}
Jul 9, 2007
How To Compile and Run a JAVA Program :
Step 1: Type your JAVA Program into any text editor like notepad or Edit (Dos Based Editor).
Step 2: Save your program (filename.java). You should use four characters extension .java just for example
hello.java.
Step 3: Compile your program with the follwing command at dos prompt
where your java compiler exist. in my case c:\jdk folder.
So first of all you have to change the directory
c:\> cd jdk
c:\jdk> cd bin
c:\jdk\bin> JAVAC hello.java
Javac is a java compiler.
if compilation is successfully done, it will create a hello.class file.
If your program contains 3 classes then it automatically creates 3 .class file, each file for each classes.
It is the file which contains byte code.
To run a java program
c:\jdk\bin>java hello
where java is a interpreter and hello is a .class file. And you are done. you have sucessfully compiled and run
your java program.
JAVA Program :
// Java Program To Generate Follwing Pyramid
//543212345
//5432 2345
//543 345
//54 45
//5 5
class series
{
public static void main(String[] args)
{
int a=1,z=0;
for (int k=1;k<=5 ;k++ )
{
for (int i=5;i>=a;i-- )
{
System.out.print(i+"");
}
for (int j=1;j<=z;j++ ) // loop to print blanks
{
System.out.print(" ");
}
for (int i=a;i<=5;i++ )
{
System.out.print(i+"");
}
System.out.println();
a=a+1;
z=z+1;
}
}
}